Sunday, January 29, 2012

Virgin Railhead 11

Well, the Railhead made a trip outside today--mainly for a couple photos, and also so I could blow the dust off of it and sweep up inside.

Not a lot of visual difference--after doing farm chores and building a new milking stand for Peanut (one of our goats) I spent about four hours tuning the turnouts.  I finally got over the throw bars, and accepted that I could solder and unsolder them at will--what is the worst that could happen?  I just have to make another one.  Here is the Gnat in some context for a change. . .


I used hardware from Hump Yard Purveyance for the turnout actuators--I installed them with enough slack so that I could re-mount them when I do the fascia.  All in all pretty slick items.  In the end, I decided to use a vertical lever actuated by the Hump Yard throw--  The throws are available at www.humpyard.com.


I like the way they work, and the Teflon sleeves and stainless actuator rods are easy to work with. 


Snap Snap go the points. .  .


Saturday, January 28, 2012

Virgin Railhead 10

I managed to get a little further down the line during the recording of Model Rail Radio.  I can't make full speed progress while listening, but then again, there is no such thing as full speed when it comes to spiking rail and soldering feeder wires.

I need to do some more work on the rust--I still want to add joint bars and some other details to finish things out--I am going to get the rest of the rail down on the module, then enjoy detailing the track.  I have to scratch build a couple of indicator/ground throws as well. 

I am glad that I am keeping things simple plan wise, because the magnitude of building everything by hand is sinking in.


That said, there is a great deal of pleasure in building something from the most basic components.  It was a joy to patch the ballast around the feeders, and watch then disappear. . .


Virgin Railhead 09

Well, I managed to "hotwire" the fast tracks Jig--meaning that I used it without PC board ties.  Instead, I soldered brass jumpers across the top of the rail..  I was just careful to bend the rail to perfect shape so that there was no tension in the rail.  I built both turnouts as one, painted and wired them, and moved them over to the ties.  I had to work back and forth to ensure that it all lined up.  Main rail is code 83, guard rails are code 70, so the tops can be rusted, but not interfere with track cleaning.  I made very minimal throw bars.

Here it is with the spacer bars hovering above the ties.

A couple more generalized views before spiking:


And here it is after spiking, with touch up started:


Looking forward to detailing and straight track. . .

Thursday, January 26, 2012

Virgin Railhead 08

Time for Ballast.  Bill (AKA Geezer) over at the Railroad-Line Forums pointed out that I might want to just do weeds and dirt, but I was already ballasting as he was making his post.  As I work on subsequent modules I am going to make some track without ballast--maybe even sunk into a section of swampy ground.

I have a pile of Adobe mix in my yard composed of local sand and clay--it matches the color of the ground, and the very tiny bits of stone match the colors of the local rocks--mixed--so, it seemed a logical starting place.  I sifted the various scales of material out and ended up with everything from "dirt" to "ballast" to "talus", and even some boulders that I have yet to sort out.  All good and useful, and the price can't be beat.  A big advantage of using real stone for ballast is that it does not float, like some brands of commercial ballast.

I ballasted in a fairly conventional way.  I placed the stone between the rail, misted it with alcohol, and then flooded it with adhesive.  The adhesive mix I use is 50% Elmer's Glue All, 25% water, 25% washer fluid.  The washer fluid works very well with acrylic products.  I use plain 70% alcohol from the drug store--nothing fancy, and spray just ahead of where I am gluing.  I don't do any gluing prior to ballast.

I am also a big fan of ballast before rail: no danger of fouling points, or otherwise messing things up.  To my eye, this is the biggest advantage of hand laying track.


I dry brushed everything with Unbleached Titanium White, both before and after ballasting to bring out the detail and add highlights.  As I work, I realize the layout will be indoors most of the time, and adding highlights is important to keep things feeling as if they are bathed with light. 


The prods from folks at the Railroad-Line also inspired me to diagram the rest of the line. I really have the bug--the track work is going well, and I am having fun. I am going to build in modules--which will let me skip around and adjust things as I need to. If I shorten or lengthen, it will be easy to change. I have a good size storage room with one door and no windows that will hold the lot of it.

Scenes from East to West:

1) Cable Works (based on a real cable works for transporting lumber down from higher elevation) The famous "Cable Mountain".

2) Lodge (Loosely based on Zion Lodge).

3) Loco service, once associated with nearby settlement, but now isolated--to expensive to move, so in the middle of no-place--a bit like some remote desert water towers on the UP.

4) Burnt out settlement, loosely based on Grafton UT.

5) Gravel Pit and remnants of flood.

6) Virgin Railhead

7) Funicular to raise cars up and down the lip of the Colorado Plateau. I am thinking of something like the inclines used in Cincinnati Ohio. . . a match for the geographic obstacle I would face if I were making the railroad in this place--and a way to make the railroad double deck (if I get that far), without hidden tracks or a helix.

8) Silver Reef, transfer warehouse to Union Pacific, Transfer Station. Probably need a passing siding here too. Railhead for Silver mines. I want to build some of the historic structures from this mining town--but am Pulling the UP down from Cedar City.

9) Long Causeway over relocated Salt Lake. Think about how the water looked in High Plains Drifter, filmed near Mono Lake.

10) Salt Works.

11) Staging

The great thing about modules is that if I get bored, or want to do something else, I am not left with a half finished model railroad. At the same time, I can get my "bucket list" of things I want to build out here.

There is nothing prototypical about the railroad--though I am borrowing freely from real places, and will borrow scenes from the "ghost rails" that stretch all over Utah.

Wednesday, January 25, 2012

Virgin Railhead 07

Made it down to the workshop before work. . . my wife had to get up early for her work, so, I found myself with a precious hour--I could start work early, or, hit the workshop.  Which to choose. .

Managed to finish sanding the ties--once I finished blocking the high spots, I hit the whole thing with an orbital sander.  I got it pretty flat--but did not go over board, a little up and down will add charm.  Went over everything with a little Burnt Umber and Davie's Gray.


I am pretty excited by the look.  I worked wet with the paint and it was not an issue.

Little bits of progress really add up!  Not to mention, they have all day to dry, in case I can sneak down tonight!


Tuesday, January 24, 2012

A good day at the Post office

No bills, the latest Narrow Gauge and Short Gazette, and two Kits from Dave Mason's ON30 IMA--

The kits are impressive.  While not shake the box items, they are clearly well thought, and, they look like they will make great builds.  I am looking forward to making them for sure.  I have added a Link to ON30 IMA on the sidebar.  Looks like fun to me.


Virgin Railhead 06

Dan Pickard raised a concern about the carboard de-laminating, and, I take the concern seriously.  My mad scientist self thought, "if a little Titebond III is water proof and modestly flexible. . . " The die was cast, and I sealed the sides of the foam and cardboard with at least 12 Ounces of the stuff.


A little sanding, and things are moving.  Hopefully this will be adequate--I will see how it drys, sand some more, and maybe add another coat.

Monday, January 23, 2012

Virgin Railhead 05

Managed to get down to the workshop. . . . and, managed to get all the ties glued down.  I went through an entire bottle of Titebond III doing this.  This is my favorite glue by far.  Even as I embedded the new ties into pools of glue, I ran more glue around the existing.  Although this might normally make things noisy, I am hoping that the floating layer of cardboard will more than deal with any vibration.  That bottle next to the glass?  That is bottle number two!


Before I went on a glue binge, I test sanded ties that I glued yesterday.  A big sanding block, at the diagonal worked best--almost like blocking body work.  I think I will be able to tune these twigs very flat.


The progress is not complete--I just wanted to do enough to be sure that I was not on a fools errand.  I am pretty excited by how they will look when the sanding is done and they are weathered.

Although my uncoupling magnets were thicker than the cardboard they will replace, the twigs will absorb the difference.


So, now to leave the glue to dry, dry, dry. . . . tick, tock, tick, tock. . . .

Sunday, January 22, 2012

Virgin Railhead 04

Back after a fast trip to California.  I managed to stay unplugged, but my modelling suffered.  It is always hard for me to start again after a cold stop.

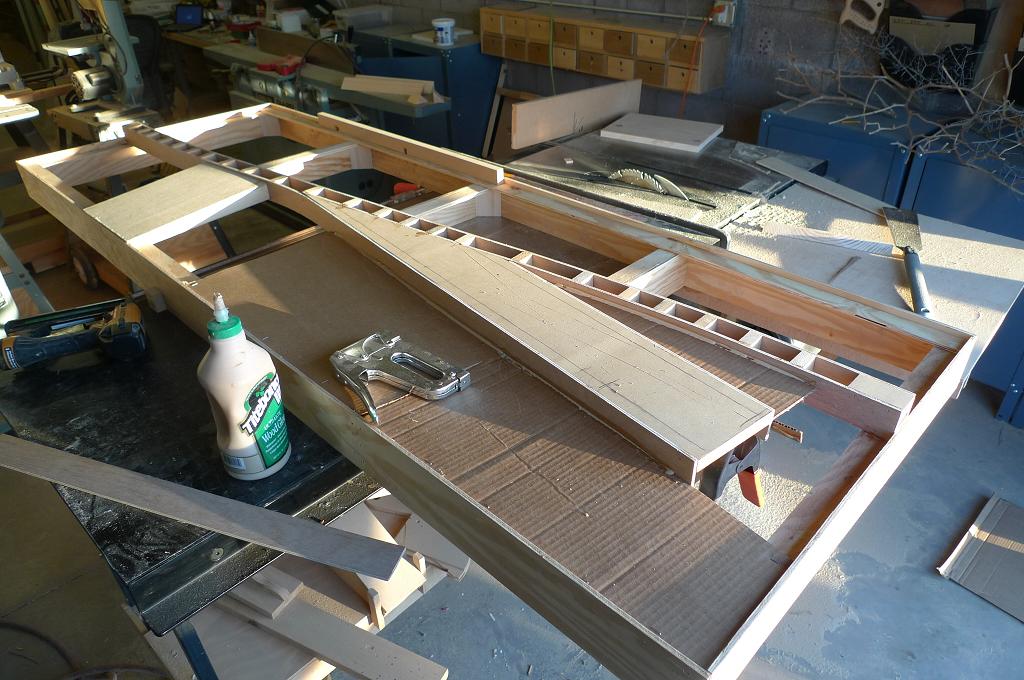
I returned to the workshop, and realized that what I had build before was still not stiff enough--it twisted a little too easily for my taste, and I did not want the torsion to "pop" the scenery.  At the same time, the "super light" concept was not so light, as I kept adding material, and the spacers I used for my splines were MDF, and frankly, that was a dumb choice for someone who cares about weight.

So, I managed to get a new piece of plywood, and made a pattern from what I had done, I liked the way it looked--so, I left the track arrangement as it was.


A little of my favorite chocolate brown spray paint, and I had a trace of the pattern.  I cut it out cookie cutter style, and framed the edges with pine at various elevations.  In the end, I had a stronger, lighter version of what I had before. 


My sub-roadbed is made of spongy foam (I am not sure what it was intended for, I bought it to make knee pads in a canoe I was building), that spongy foam is topped with cardboard.  The combination is great, in that it will perform its task as sound isolator, but will still provide good tooth to glue the ties to.


The ties are Datura Stramonium, which are prolific here.  The branches when dried make great logs--though I am careful with it.  The seeds and flowers are toxic--and although I think the dried stems are harmless, I still take care with the dust.  Some people attempt to ingest the plant for its hallucinogenic effects, however, it seems like doing so would lead to certain brain damage.  It has been used both as a poison and a hallucinogen by native people in the Southwest--I can add to its storied past by using it as scale railroad ties.

Back to model railroading: My plan is to sand them level once the glue is adequately dry.


I made up a turnout using an HO #4 Fast Tracks jig I picked up on Ebay.  My plan is to use the jig without ties, and solder spacers on top, so I can drop the turnout on to my own ties.  Rather than draw the turnout, I just whipped a couple out using the jig, and used them as spray paint templates.  Then I used my favorite sideways cutting drill bit to make the slots for the actuators.


You can see that some of my ties are massive, but I think they will look good when they are sanded and weathered.


Added some more glue to the edge of the ties just to make sure they are secure for the sanding festival. 

I have to go "pick" another few dried out Datura plants to finish up. Gluing ties will make a good little job that can be done just about any time.  It felt good to make a little headway after time away.

Tuesday, January 10, 2012

Troels Kirk's Realistic Color for Railroad Modelling


[If you are searching for Troels Kirk's store front, there is a link in the side bar of this blog. . . ]

Something everyone can learn from. . .  

I had the pleasure last night of watching Troels Kirk's video on Realistic Color for Railroad Modelling.  As someone who normally has a distaste for model railroad videos (at least the ones I have seen), I can say that this is something different and special.   It is less about any particular result, and more about an approach to color, and as important, to understanding color in the world we are trying to represent.

Troels plainly lays out his palette and approach in a way that is more like my time in art school than a how to video.  He describes some important concepts that model railroaders have been aware of, but using the terms and the approach of an artist--which in the end makes them simple and clear. 

You will not learn to paint like Troels Kirk in an hour. . . . however, I can guarantee that you will get a great deal from the video: I did.  If you do not paint with acrylics or adopt his techniques, his observations from life will still be useful to you.  Even if you are very experienced with acrylics (or attended art school. . . . ) I can say that seeing someone else's palette and methods is always an eye opener.  

In general, the hobby literature and videos tend to focus on achieving predictable results quickly.  There is certainly an important place for that.  However, what Troels Kirk has done is make a video that encourages people to develop and explore color for themselves--to take a journey and to develop as an artist.  If you are just starting out, his tips on choosing and mixing colors will jump start you to success much faster than might otherwise be possible.  While mixing color for yourself may sound intimidating, doing so will create a relationship among your models--making your work more cohesive over all.  And of course, there is more too. . . .

Although the techniques and approaches illustrated do not promise instant results, they are an invitation to approaching the entirety of your railroad models in a more artful way--without fear.

Troels has done a great service to us by framing railroad models in the terms of the artist.  While there are many important aspects of the hobby, he has given voice to the more painterly and imaginative aspects, which I care about deeply.

There is a link to Troel's store front just to the right in the sidebar. . .


Sunday, January 8, 2012

Virgin Railhead 03

Rather than fuss with structures, thought I should get some context: fast.  So I dismantled an old shipping crate and salvaged some 1/4" plywood.  Built some "L" girders with that thin material, and fashioned a ladder frame.  Fortunately, I had a brainwave, and realized that 3'-0" was not going to cut it, since the clear space of a 3'-0" door is more on the order of 34", less if the door can not fully overlay the wall in the room it is swinging in to.  So, 30" wide it is.  Since I lost 6" in width, I treated myself to another 4" in length.  Not full compensation, but a little.

Roadbed is a fairly traditional spline arrangement.  I "transfered" the plan by eye. . .having sketched it twice I have a pretty good feel for it.  As I get things firmed up, I am adding sub levels for the future terrain.  Already have a neat idea for how to work the pickle facility in.


The road is 40' wide--narrower than I wanted, but, when I add the irrigation ditches, it will get bigger.  Given the montage method of construction, I will need to do a few revisions--but that should not be too much trouble.

Probably will need to leave this be for a bit, as the coming week is very busy, maybe back at it tonight.

. . . And, I did manage to get back--a little further on filling in some holes:


Running out of scraps though. . . . . enough for one night.

Changing Skills: A Good Time to be in the Hobby

Instead of telling new model railroaders how it's done, lets ask them how they want to do it.

 It is a great time to be a model railroader--but not for the reasons people usually suggest.  Usually when people make a statement like that they are referring to products.  I am interested in something else, however.  That is the number of people re-thinking the way that we make models and the new skills they bring to the table.

A brief look around will reveal  a wide range of people coming from different directions.  Troels Kirk and Frederic Testard are making beautiful structures with little more than paper, paint, and foam--the pinnacle of modesty.  That Troels brings his skill as a painter to the entire work of the model railway has a tendency to change, if only slightly, the way many things are done.

The same can be said for Lance Mindheim, who in the latest Model Railroad Hobbyist magazine demonstrates the elegance of making structures from photographs--Photoshop and similar programs are becoming as essential to the hobby as an Exacto knife.  Speaking of which, Jim Gore did a great deal for the cause of printed paper models during the Model Rail Radio program recorded on January 7th--both illuminating the techniques he used, and reassuring people of the permanence of his efforts.  How refreshing is it to not have to be told about mixing a stain of alcohol and India ink--nothing against the stuff.  (There is a permanent link to Model Rail Radio in the sidebar of this blog.  You can find Lance Mindheim's article here: model-railroad-hobbyist.com/magazine/mrh-2012-01-jan.)

I could go on about other examples--whether referring to people with electronics and programming experience, or my own explorations of inexpensive laser cutters.  The short version of the story is that there are dozens of people bringing new skills to the table--many of them borrowing from their professional lives as artists, graphic artists, architects, and engineers of all kinds.  This infusion of skills, and the questioning of the usual order of operations is incredibly healthy for the hobby.  Instead of telling new model railroaders how it's done, lets ask them how they want to do it.

I suspect a couple decades from now people might look back on this time--with its explosion of model rail media and infusion of techniques as a new kind of golden age for the hobby.  Lets hope this continues and that becomes true.

[As a note, I am removing some of the more detailed labels, and am going to place all of the commentaries under the label "sketchbook"]

Saturday, January 7, 2012

Minimalism

Terry Terrance discussed his photo backdrops during model rail radio tonight, and it prodded me to think about the possibilities of minimalist scenery.  Anders Wirten pressed me on the issue in an e-mail after I made a comment in the chat--and it seemed appropriate to go a bit further with the idea in this context.

I know a lot of people will think of Dave Barrow's Cat Mountain and Santa Fe layout when they here mention of minimalist scenery--flat modules with structures, and not a lot else.  That, however, is not what I am thinking of.  I am wondering how little scenic work one could do and still achieve an engrossing scene, one which invites the viewer to suspend their disbelief--and "enter" the scale creation at a deeper level if only with their eye.

Could you model Kansas, or Eastern Colorado with amber waves of static grass and a photo?  I think so.  Could you model the Lucen Cutoff--a long rail causway crossing the great salt lake with a photo for the sky--and a photo of the water--or, of the sky again--representing its own reflection.  The photo of the cutoff below, incidentally,  is from the HAER collection of the Library of Congress.


It seemed clear to me that Terry was conceiving of his scenes with photos in mind--understanding the way that the photo and the models would work together to create a cohesive scene--that photography is not an addition the the model--it is modelling.   Terry's Blog can be seen at 2railoscale.blogspot.com.

The other model railroader that comes to mind is Pelle Soeborg.  Although his former Danneville Subdivision layout had complete scenery in the traditional sense, it has a clean, sparse aesthetic with plain, even banal structures.  There are not details pouring from every corner--but rather there is an openness and clarity that is itself evocative of the American West.

While my tendencies might be toward more scenery proper--it is fun to think about how little actually needs to be done.


Friday, January 6, 2012

Virgin Railhead 02

Well, I have still been away from the workshop, but have managed to advance the Virgin Railhead concept.  As many things as I want to build, I think it will be healthy to stick with a single concept for a little bit--and then to decide what to do next.  Too many irons in the fire can stall the mind.

Getting real about dimensions and proportions has meant setting aside some dreams, but others have become more realistic.  I realized that if I wanted to have any sense of breadth or expanse in the layout, I would need to cut out the longitudinal street.  I want to be able to aim a camera through the scene to a natural landscape beyond and have the interstitial spaces remain believable--to have that Plat of Zion feel. 

The pickle house and stores will be of a more industrial nature, and, will not adhere to the grid.  By further twisting the grid slightly, the entire scene can be varied in relationship to the layouts edge.  Although the road will ascend to the North (up), my intention is to drop the pastures (they are to be flood irrigated), such that the edges of the layout generally fall away from the camera, and the viewer.  Thinking that the display, when set up, will be on a table top, and therefore in the round--at least for now. 

Of course, should I like it--I can run track from either end.

Sunday, January 1, 2012

Abstraction and Imagination

In the last several days I have been thinking about two distinct questions as they pertain to making model railways: the first is the role of abstraction in model making, the second is the role of the imagined subject. Both topics have been the subject of "indirect discussion" for some time, but I think it is worth untangling them.

I have been thinking about abstraction in regards to Dan Pickard's Bush in a Box project. In a post on the Railroad-Line forum he made it clear that the square tips on some plants he modeled were not unintentional-- that he imagined layering detail, so that the over all impression of the model was convincing, but also indicating that much would remain abstract. To my eye this is thinking in the mode of a painter. I think the best model makers also think this way, recognizing where gesture and a viewers expectation conspire to create a complete illusion. It is convincing and efficient. At a time when it is possible to miniaturize so much--so many models are literal reductions--it is easy to forget this essential part of the model makers art.

To my eye, the imagined model has similar potential for the model maker,. An imagined model executed well convinces the viewer to suspend their disbelief and enter an imagined realm-- a place, or state of mind (to borrow the phrase Anders Wirten used recently on Model Rail Radio) that they might never have otherwise experienced or entertained. When we visit George Selios' Franklin and South Manchester, we do not visit depression era New England, but Visit a world created from whole cloth now shared by viewer and maker. While truth might always be stranger than fiction, our ability to create and experience fiction is distinctly powerful.

The photo here has nothing to do with either of the above points, rather it is my own digression into imagining Pieter Breugel's Tower of Babel as a model railway.