Monday, December 31, 2012

Engine Crates 02


The engine crate shed is moving right along.  Efforts of late have focused on "piecing" in a couple of the construction gaps, painting hidden edges, and building an adequate foundation.  

The foundation is a small plane of wood drilled to accept the piles.  This places the piles inboard of their position in the photo.  I decided to deviate here, as I much prefer the strength of a positive connection.  The floor and body are a slip fit, so, adding light is still an option.  That the walls have a black core helps in that regard.  While I am going to wait to do final scenery until I put this one on the layout, I am going to go ahead and make a diorama base for this one.


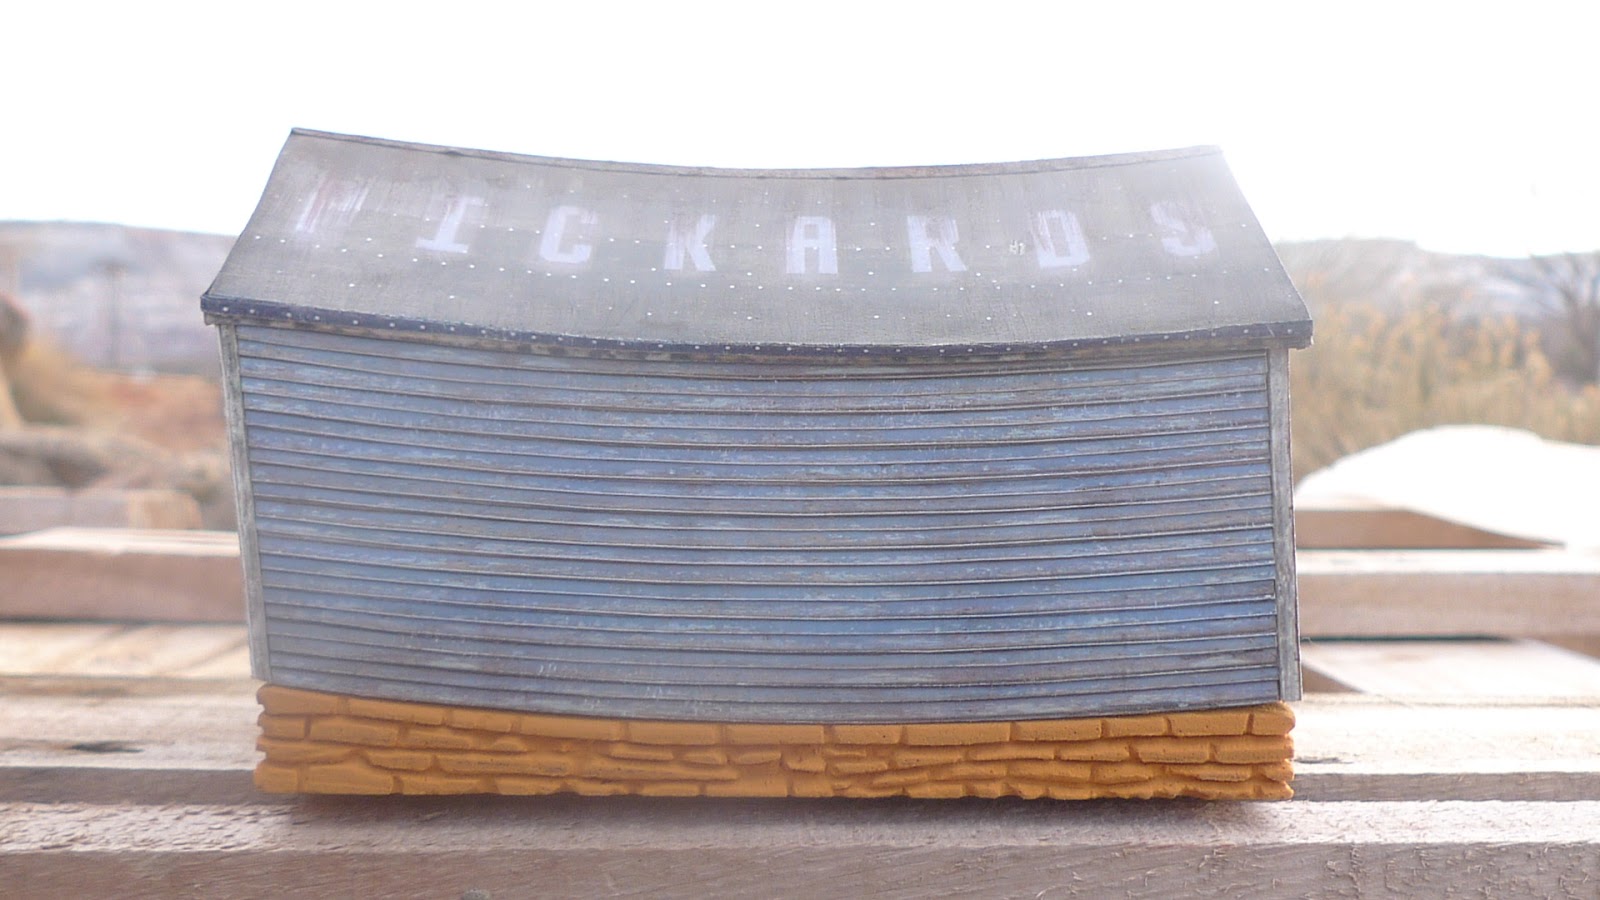
I also added a stove pipe soldered from three pieces of brass tube, as well as a foil ridge cap.  The sienna paint from the ridge cap has been streaked down the roof.  A little more under the stove pipe.  I have slowly been adding paint to the boards to make them appear more varied and three dimensional.  I am now on a quest for material to add the mesh below the floor.

Uncouple Anywhere 05, Happy New Year!


I've been racing to finish a lot of models with an eye to 2013. . . there are so many models I want to make that I feel like I need to finish a few.  To that end, I have been pouring energy into the servo uncoupler, and every other model on the workbench.  I'm even going into mass production on the boxcar guts. . . 


Of course, that means queen posts and bending truss rods. . . hence the spray paint pattern above.  Clearly, these won't be done in 2012!  So, time to take break and wish Joy and Peace to all. . . . Happy New Year.

Pickard's 01


I've been holding out on you all just a bit, as I have a couple models that I have not been posting. . .  .gasp!  This one was under wraps because I was wanting to surprise modeler Dan Pickard on the Model Rail Radio Facebook page.  This is all a roundabout way of honoring the construction of a new shed he is building to house his model railway.  Hopefully the real thing will be a bit straighter than this.  I take particular pleasure in making buildings that move and sway.


The other interesting aspect of this shed is the fact that virtually all the coloring is printed using Clever Models textures.  I used a process similar to the engine crate shed, working back and forth between Photoshop and AutoCad.  This allowed me to "curve" the clapboards and create a cut file that matched them.  I borrowed the cut file for the window from the "Shifty Shack" and colored it using Photoshop  integrating it into the art for the whole thing.  The latch is simply a photo of a rusty hasp dropped into the door art.  The door and trim are made from another Clever Models texture.


I warped the tarpaper roofing in a similar way, adding the "Pickard's" logo on top.  The typeface was purchased from My Fonts which is my favorite source for letter forms. . .  . .I'd rather pay a little, and get something period appropriate.  With the success of this experiment so far, I went ahead and immediately bought a few more textures from Clever Models.  Foundation is Balsa foam.  Look forward to more on this line of work.

Virgin Church 05

The Virgin Church is slowly progressing.  Today I managed to cut most of the clapboards and wall sides.  The windows are integrated into the wall sides.  This not only makes the windows stronger, it also allows me to etch guides on the wall to make mounting the clapboards easier.  The clapboards include nail holes, edge variations, and joints, all of which will become more subtle after paint.  Everything is cut from 6 ply railroad board, not dissimilar from manila folder material.  With luck I won't overdo it tonight, and can make some progress tomorrow!


Sunday, December 23, 2012

Engine Crates 01


Every once in a while you see a picture that just grabs you.  That was the case with a 1939 photo of a small shack in Texas.  I became aware of this particular image by way of the Fine Scale Miniatures Yahoo Group, where Darryl Huffman posted a link to the photo on Shorpy.  Darryl is a font of information, he sells all manner of DVD's and information related to fine model building (His site is here).  Fortunately for me, he is also great about sharing good Shorpy finds.  If you have not been to the Shorpy website, it is a great place to find inspiration and loose track of an hour, two. . . or three. . . . or four.  The image from Shorpy is below, my basic body build is above (sans metal details, painting, etc. . .just the facts of printing, paper and glue).


The essential feature of the shack in my mind is the fact that it is made out of Wright Aeronautical Corporation Aviation Engine Crates!  Given how interesting the crate printing is, I decided to make a printed model, much in the vein of the paper boxcars, except for the fact that the artwork is entirely derived from the single photo.  I used similar techniques to those that I used to do the signage for Uncle Paul's (a project I am still working on).  The major difference here is that in the Uncle Paul's project, I simply re-worked and extracted the signage.  In this project, I am really trying to work entirely from the photo.


I began by flattening each of the two sides of the shack in photoshop.  This was done with the "transform" command under the "edit" menu in photoshop.  If you are not used to working in photoshop, the key thing you need to keep in mind is that to apply a command to the photo, you first need to select it using either the lasso or one of the other selection tools.  In this case, I just transformed the entire photo twice, and then combined them.  Under the "transform" command, you will find several useful options, including distort, skew, perspective, rotate.  I use all of these commands and more to coax the image into something that looks like an unfolded elevation.  


From there, I did some basic color work.  I tweaked the contrast and saturation to bring up the detail, and push the black and white image towards brown.  Using duplicate layers, I created a light layer and a dark layer, white and brown respectively, that I applied as transparent overlays in order to enhance the detail of the wood.  After that, I carefully edited out the mop, and other three dimensional details.


Once I had some credible material, I created a set of back walls and also began to copy extra parts that I would need when building the model.  The image below shows my basic art work sheet. After some last tweeks I adjusted the DPI to suit the scale and print size, and I was off to the races.


Once I had my basic artwork sheet done I loaded it as a "raster reference" in Autocad.  I simply traced the various layers that I would need to cut with the laser and created a layout for a simple bass wood core.  While this could have been done manually, I decided to go ahead and make a set of cut files in the event that I wanted to remake and refine the model further.


After all the lead up, I am excited to detail the model, and add some paint.  The impression I have now is that the photo might be too detailed for the scale, and that I need to tone things down a bit to have it settle in.  I think it will improve as I add in details.  One thing I have come to understand is that these things tend to look better and better as one follows through, so even if it is not feeling 100% yet, perseverance usually pays off.  I'll get some details on tomorrow, and shoot photos in some better (and even) light. . . 


Video Extra: Laser Registration

I received an e-mail from a friend asking about how I achieved registration between artwork and a cut file (as in the Paper Boxcars).  I thought it would be another good item to illustrate with a bit of video.  The only problem, of course, is that the uploaded video displays a Moire pattern due to the curved lines of the model art and the You Tube video compression.  Needless to say, I am still learning.


The featured projects have yet to appear here, but will soon!  While you can't see the peeling paint very clearly, it is a texture from Clever Models.  I've purchased several of their textures and I'm a big fan of their work, so be sure to have a look.

I know that Thom Miecznikowski had been exploring the idea of using KNK craft cutters in to cut out building textures and I was very interested in that line of thinking.  I'm looking forward to posting my experiments here.

Thursday, December 20, 2012

Uncouple Anywhere 04

I have been working on the guts for the paper boxcars, and in doing so have been evolving the servo uncoupler.  The first version which I made for Salt Wagons 1.0 swung the coupler down.  In the boxcars, I am planning to drop the couplers straight down.  This will make things absolutely reliable when the couplers happen to be under tension.

I played with all kinds of attachment methods for the draft gear box and decided that fabricating brass draft gear was the cleanest, strongest and most reliable.  The servo horn will act directly on the vertical shaft so there is very little slack in the mechanism (I still need to add the slot to the shaft in this picture.


I made a batch of draft gear box / shafts.  These were later changed to eliminate the overhang at the back of the shaft.  The entire works slides up into the boxcar body like the bottom half of a hat box.  A couple tabs projecting from the floor hit the pockets on the side of the body, and the mounts inside support the ridge beam of the box car.  Together, the assembly is very solid.  I kept the middle of the boxcar clear in case I want to do a ventilated box or open door.


Doing this has made me re-think the salt wagons.  I have some small servos, even some linear servos.  If I play my cards right I see no reason that Salt Wagon 2.0 could not have a straight drop.  I also see that I could put the works in the roof of a stock car.  I am going to get these boxes worked through before designing anything else.  I learned so much from the salt wagon mechanism. . . I'm sure the same will be true for these.

Wednesday, December 19, 2012

Water Tower 02

It's been a while since I have worked on the water tower project, but I finally got the steam to continue.  Part of it is just the end of year push, and part of it is the knowledge that I can start new projects once some of the others are behind me.  I glue laminated the body of the water tank from 6-ply railroad board, and formed it around of core of corrugated cardboard circles.  Because the side is a cone, rather than a drum, the wrappers were carefully designed and cut.


You can see where I have the bands planned.  I have cut each band fit its location so it will lay flat against the tank body.  The taper is very subtle, but I think it is one of those details that will make the tank.  While the tank body was drying, I did some water color experiments on an earlier lamination that did not come out well.  The results are not there yet, but that is why they call it practice.


I am excited by the potential luminosity that I could get out of water color, and the possibilities of layer effects.  I plan on practicing on the rest of this before tackling the main tank body.


The entire thing began as an experiment in developing shingles for a curved surface.  The sub roof has lines to guide the shingles.  I am amazed by how fast the superstructure is going together after taking the time on the geometry.   On to the bottom half this weekend, and hopefully some painting.


Monday, December 10, 2012

Virgin Church 04

This weekend saw my return to the Virgin Church.  As 2012 comes to a close, I have been rolling back over older projects to see if I can get the decks cleared for a few new things.  Not starting anything new until a few things are finished is good motivation for me:  I have so many new ideas that I am chomping at the bit to try.
The steeple is composed of stacked illustration board, four basswood posts, and a folded piece of poster board.  The scored and folded roof worked a lot better than I thought it would.
Once I managed to get the guts of the steeple together (it still needs siding), I turned my attention to the bell. While I could turn the bell on the jeweler's lathe in a few minutes, I decided that I would make the bell itself using rapid prototyping, mainly as a learning exercise (I can always go back to the lathe!).  The bell cradle and the wheel for the rope will be laser cut and stacked, as I don't want to make my prototyping exercise too complicated.  I figure if I get through that, I will be able to take on some of the other challenges I am interested in.
I began by tracing an image of a bell in the Wikimedia Commons.  It's hard to see my lines, but I simply imported the image into my cad program and traced it.  After smoothing the curves I had something that I will be able to revolve into a 3d model.
Shown in scale, the bell is really very small.  That said, I think the detail in the belfry will be plainly visible, as it will be one of the higher structures.  It will be interesting to see how my big fingers contend with this one.  Before closing out the files on the church, I went cut and assembled a core.  The openings are over sized for the windows to allow space for glazing and the other artifices of model building.  
I'm going to take some time in the coming month to clean up the labels on the blog in order to make it easier to pull up entire projects.  You may have to scroll back a bit to find the last installment that focused on the siding for this building.  

Sunday, December 9, 2012

Video Extra: What's Inside

A couple questions came up on the latest recording of Model Rail Radio, one of which had to do with what's inside a model.  It seemed just as easy to shoot a couple minutes of video as it would have been to write a full post, so I did just that.  This segment addresses the question of what's inside the models, and gives you a glimpse inside of a few of the projects on the blog, and at least one that has yet to make an appearance.

I'm calling this an "extra", since I will continue to post about the individual projects.  Back to the workshop. . . . 


Monday, November 26, 2012

Shingle Shed and Shifty Shack 14

It's been a while since I worked on the Shingle Shed, but I made some progress.  I took a break from freight cars and cleaned the workshop.  In the process, I found some doll house molding that I misplaced.  I had bought it with the intention of using it for the eaves of the shed.  Finding this lost treasure was all it took to get me back into the building.

I gradually finished out the corner boards and eaves. The roof is a double layer of chip board, and the tar paper is used tea bags colored with acrylics.  There is still some detailing to do, but the thermal enclosure is done.  Looking back at this earlier paper model makes me realize how much more efficient I have become.  There are several spots in the shingle shed that are over engineered.  I am going to have to look back at the Virgin Church, and see if I can't speed that along in light of my realization.

Too bad that the module that this will go on does not even have a baseboard.  Thinking that I am over complicating those too, and need to get my head out of my behind and accelerate that process with a simpler construction technique.  Plenty time to think about that while I dawdle weathering and finishing the shed. . .  .

Just as a side note, I did use that Tite Bond 3 to glue things together. .  . it only looks like I drink it.

Sunday, November 25, 2012

Paper Boxcars 03

I'm in love with paper.  Considering the success I've had with structures like the shifty shed, it is baffling that I did not turn to it for rolling stock sooner.  A gap in the imagination that has been resoundingly filled.


The results so far include 4 box car bodies, the two Klyzlr boxes, and a couple testing the Photoshop template.  The car is based on a boxcar from Slim Gauge Cars.  I like the chunky proportion, and working so closely to plan makes me realize that the salt wagons are in fact a bit narrow.

In drawing the cars I created two extra layers, one was a registration line, the other was a text guide.  Those lines and guides are in each file.  By taping a piece of cheap chip board to the stage and cutting the registration line I was able to create a fixed template.  The printed board was slipped under the template, and lined up.  This ensured registration.

Each box consists of two cut sheets, a detail sheet and a body sheet.
Rather than print on white card I printed the bodies on acid free paper and mounted them to black card.  This saved me from having to marker edges of the board later.

I added color to the bodies using acrylic washes, and straight acrylics.  The grab irons are staples left over from my broken staple pliers--might as well use them.  Bottom door guides are wires. The shot above shows the end prior to having the transom attached.

Today's task, if I can make the time, is to get the uncoupler guts configured.  I also have some work to do on some other designs.  I am going to spend some time considering a way to do a two sided registration such that I could make a paper gondola.

Thursday, November 22, 2012

Paper Boxcars 02

The paper boxes are progressing, even if only on Photoshop.  Spent much of the week re-working the art and the cad file.  After locating the grab irons and details on the cad model, I went ahead and created a template for Photoshop.  This will let me get artwork going for any number of cars in short order.  Becoming serious about the details of the car also forced me to rework the Prof's car.  That's fine, because I made an error in the name, including an initial that did not belong.  Prof was fast on the correction, and I could not let the error stand.  The final artwork read's "Prof. Klyzlr's Pummel Proof Encyclopedia Sacks."  I'm pleased to report that car 519 is also progressing.  I plant to take the rest of Turkey day to finish the guts of the car, and hope to start cutting them tomorrow.  519 includes graphics, and I have some serious art planned for the tomato car.  Hoping that the proof of concept works with the text based bodies.


Sunday, November 18, 2012

Timber Terminator

No, I have not started buying cases of smokes. . . . this is less a lighter than a device to grain the end of scale timbers.  I finally got tired of running back and forth to the car.  Although the lighter assembly is cheap, a 15 amp power supply is required to get the little bugger hot.  Fortunately, I had one of those--I just added some spade connectors to the lighter so I could quickly disconnect it from the power supply, allowing it to be used for other projects.  The stand is made from acrylic.  I was nervous about the heat at first, but, I have yet to melt or warp the acrylic.  Let's face it, the duty cycle is not too severe.


The best results come as the lighter coil cools to a sweet spot, allowing you to do several timbers.  A nice touch for those exposed bits of end grain.


Saturday, November 17, 2012

Paper Boxcars 01

As I finish the Salt Wagons I have started to design a set of boxcars.  The plan so far is to print the artwork on card stock and then laser engrave texture into them, making something like an old kit with embossed paper car sides.  The first wagon is an homage to the Prof. . .  .if you have yet to be pummeled, just tune in to Model Rail Radio, and it will all make sense.

This is the current draft of the car printing, not yet in color.  I have been laying the artwork out in cad, and then moving into Photoshop to make sure that the registration marks line up.  I have a "tomato" car in mind, and I am excited to do some more elaborate art work.  For the time being I am doing proof of concept with text.
The earlier draft did not have a car number, and I thought the slogan was to prominent.  The car number is essential, since that will be the digital address of the uncoupling system.   I also wanted the humor to be a 'tad' more subtle.  I have been toying with the color, and I am pretty excited by being able to produce a faded boxcar red right out of the starting blocks.
The layouts for the printing and engraving are progressing.  The superstructure will be built in layers for surface relief beyond the engraving.  I still have to lay out the grab iron and bolt locations.  I am measuring staples--seeing as I hate bending grab irons, and fine staples might just do the trick. 


Sunday, November 11, 2012

Salt Wagons 01

The salt wagons are slowly taking shape.  It's been a while since I have posted for the simple reason that posting repetitive tasks gets really dull for readers. . . "look, more flash removed from detail parts" is just not exciting.  Most of them are still in the tray, waiting to be put together.  Never mind that a wheel is off the track in the photo above--it was the only way I could keep it from rolling off one end or another.

I made several wood trays to hold projects--actually, I had originally built them to hold color sample sets for my architectural clients, but they are more frequently used to hold models in progress.  This way, everything can be sorted.  Filling the tray tables took a bit of effort with 8 cars in progress.  Staining, preliminary "salting" (with some white paint diluted in alcohol), and rusting (paint in alcohol, not really mixed).


The trucks and under bodies are airbrushed--the rest is poorly mixed paint and stain.  So far cars 312 and 314 are about 90% complete.  I have a little more detailing to do on them, and some final painting, but I need to get the other six up to standard first.


Making these cars has been an interesting adjustment.  Size wise, a 24' car in ON30 is the length of a standard gauge freight car in HO (at least one in US outline).  I found myself looking at slim gauge cars repeatedly in order to get some sense of proportion.  Getting them on the rails, I am glad that I changed my coupler height to ON3 standard, lifting the car body somewhat.  Doing so really helped with the chunky proportion--something I like.